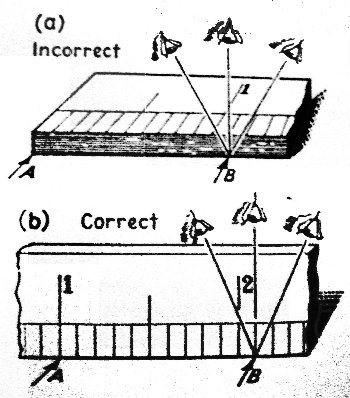
Figure 3-1: Proper Ruler Placement
Image by A. R. Mott in Basic Physics, 8th ed., Volume 1
| NAME | DATE |
Whether you are doing experiments or building the DiscoverHover One hovercraft, it is important for all your measurements to be precise and accurate, without being excessively complex or time-consuming. The concepts of precision and accuracy are different but related qualities of every good measurement. Precision refers to the variability in the measurement; in other words, how much difference there will be between more than one measurement of the same thing. Accuracy refers to the closeness of the measurement to the true value of the quantity. A method of taking measurements that is both precise and accurate will consistently produce measurements that are very close to the real amount. If a measurement is neither precise nor accurate, it is usually apparent because the results are widely scattered. Harder to detect is when a measurement is precise but not accurate. The values will all cluster around a particular point, so it may appear that the data is valid. A measurement can be accurate on average if the central point around which the values of several measurements are scattered is close to the true value.
No matter how sophisticated an instrument you use, you will never achieve perfect precision, but there are methods you can use to make your measurements as precise as possible. The first way to accomplish this is to use the proper instruments and to use those instruments properly. A way to further reduce error is to take multiple measurements, preferably taken by multiple people, and average the results. The more measurements you take, the more precise the measurement will become. However, taking more measurements takes more time, which can cause problems for two reasons: 1) it takes away time that could be used for building your hovercraft, and 2) the quantity may change over the time it takes to perform multiple measurements.
To ensure that a measurement is also accurate, instruments must be calibrated against known quantities. For example, a weight scale is calibrated so that it reads zero when nothing is being weighed.
When measuring a distance using a tape or ruler, you position the ruler and object so that one end of the object is aligned with a fixed point, usually zero, on the ruler. The other end of the object will fall somewhere along the length of the ruler, either on a mark or between two marks. If it falls between two marks, you must estimate the fraction of the space it covers. There is another potential source of error inherent in the physical process of taking a measurement with a ruler. The distance between the measuring marks and the surface being measured causes the measured result to vary depending on the angle from which it is viewed. This is called parallax and can cause large errors in measurement.

Figure 3-1: Proper Ruler Placement
Image by A. R. Mott in Basic Physics, 8th ed., Volume 1
The problem of parallax can be avoided by placing the markings in direct contact with the measured surface.
The resolution of a ruler is also limited by the size and separation of marks the human eye can clearly determine. One way to measure distance more finely is with the Vernier scale, which uses a special gauge parallel to the main gauge to effectively amplify the divisions. The second gauge has divisions that are shorter than those of the main gauge by the length of the desired subdivision. For example, if the main gauge is in mm, then the desired subdivision will be in tenths of a mm and the Vernier gauge divisions will be nine tenths of a mm. This is illustrated in Figure 3-2.

Figure 3-2: Reading a Vernier Gauge
Image ©2006 DiscoverHover
To read a Vernier scale, you first look at the units on the main gauge. The object being measured will probably not line up exactly with one of those marks, so you use the Vernier gauge divisions to measure more exactly what portion of the division is occupied. One of the marks on the Vernier gauge will line up with a mark on the main gauge; this is the mark that represents the fractional subdivision. In Figure 3-2, you can see that the object is between 9 and 10 mm long. With a normal ruler you would have to estimate just where between the two it falls, but with the Vernier scale you can judge more accurately. In Figure 3-2 the sixth mark on the Vernier gauge lines up directly with a mark on the main gauge. Note that it does not matter which mark on the main gauge you use; it matters only that a mark on the Vernier gauge lines up with a mark on the main gauge. You can then add the two components together to see that the object is 9.7 mm long. The Vernier scale is used on many different instruments for varied purposes; the most common use is on slide calipers as shown in Figure 3-3. Most slide calipers will have locking screws on them so that once the calipers have been positioned on the object, the caliper will not change.

Figure 3-3: Slide Calipers
Image by A. R. Mott in Basic Physics, 8th ed., Volume 1
For even finer measurements than you can achieve using slide calipers with a Vernier scale, an instrument called a micrometer is used. The micrometer has a rotating thimble threaded on a screw to allow for fine adjustments. Each time the thimble undergoes a full revolution, it moves exactly the distance between two threads on the screw, magnifying the distance measured by a large factor. Protruding from one end of the thimble is a sleeve marked as a ruler, which gives you the general size of the object being measured. That end of the thimble is marked with the fractional measurements it measures, and in order to avoid parallax errors, it tapers such that the marks are in contact with the sleeve.

Figure 3-4: Micrometer
Image from http://slincs.coe.utk.edu/
To measure an object, the thimble is rotated to move the sleeve so that the spindle contacts the object. The marking on the sleeve at the edge of the thimble shows the general distance. In Figure 3-4 you can see that the object is between 12.5 and 13 mm. If the threads on the screw are 0.5 mm apart and the thimble is divided into 50 equal portions, then each mark on the thimble represents 0.5 mm / 50, or 0.01 mm. The mark on the thimble that lines up with the scale line on the sleeve is the one that indicates the proper measurement when added to the measurement on the sleeve. To increase the precision still further, a micrometer can also have a Vernier scale on the sleeve, allowing the marks to line up with the marks on the thimble, as shown in Figure 3-4.
Quiz Questions.

| ©2006 World Hovercraft Organization All rights reserved. Copies of this Curriculum Guide may be printed for classroom use exclusively by DiscoverHover registered members. This Curriculum Guide and all materials contained in the DiscoverHover web site are protected by copyright laws and may not be reproduced, republished, distributed, or displayed on any other web site without the express prior written permission of the World Hovercraft Organization. |